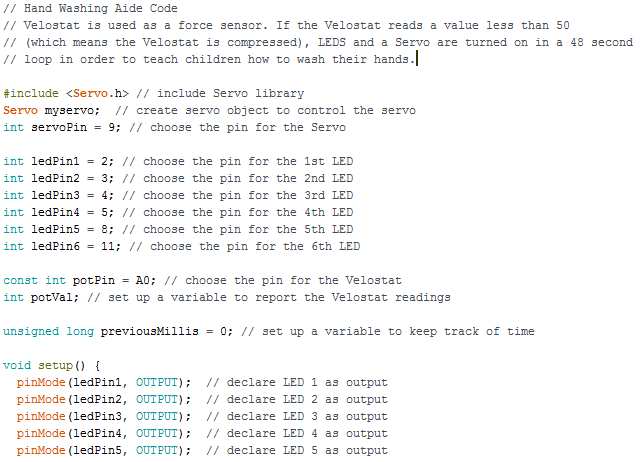
This week was incredibly productive and exciting.
We were having a problem with our LEDs where around the 4th loop through the system, it'd get stuck on one LED. We found out the problem was that millis() was getting too big for our variable type. We had declared previousMillis (the variable that is set to millis() at the end of every loop) to be an int, which can only store values up to 32,767. Once millis() reached 32,767, previousMillis() couldn't update anymore, so it'd get stuck on the last LED. We changed previousMillis() to an unsigned long, which can handle values up to 4,294,967,295. This means that the program could run for 1193 hours, or 49.7 days, before getting stuck. This won't be a problem, however, because the device will be switched off at night, and when it's switched back on in the morning, millis() will reset to 0.
We also worked on our Velostat this week. We realized we'd set it up wrong last week and needed to attach it just like a potentiometer so we could read values from it. After fixing the circuit, we got a reading of 0 whether the Velostat was compressed or not. We had decided to give up and try to use buttons or a photocell instead, but then Amy pointed out a line in the tutorial code that we had overlooked. We added this line to our code, and the Velostat began working! The values didn't range from ~0 (max pressure) to ~1023 (no pressure), the way they did in the product tutorial, however. They ranged from ~0 to ~100, so the Velostat was less sensitive than the advertising made it seem to be. However, we don't need to differentiate between different amounts of pressure for our project, we just need to be able to tell whether or not someone is standing on the sensor. The Velostat is fine for this purpose. After some testing, we settled on a value of 50. A reading of less than 50 means the Velostat is being stepped on, and greater than 50 means it's not being stepped on.
Next, we made a mat. We used the most waterproof yoga mat we could find and cut two 50 squared in. pieces. We sandwiched the Velostat square in between them and hot glued them together. Then we drew a little pair of feet on the top of the mat with a paint pen to indicate to the children that they should step on the mat. Since we had wires coming out of the mat to connect the Velostat to the Arduino, we wrapped them with electrical tape to turn them into a single cord.
The next problem was our Servo hands. We wanted to edit our code so that the motion would look more like hand washing than waving. Originally, our code had the Servo rotate from 60 to 120 degrees. We decided that a third of this rotation would be a good amount. However, when we changed the code, it still rotated from 60 to 120 degrees. We remembered reading that the delay controlled how long the Servo took to complete the rotation. We had a delay of 1000. We thought that since we wanted the Servo to rotate a third as much, we should divide the delay by three. We changed it to 330, and that did the trick.
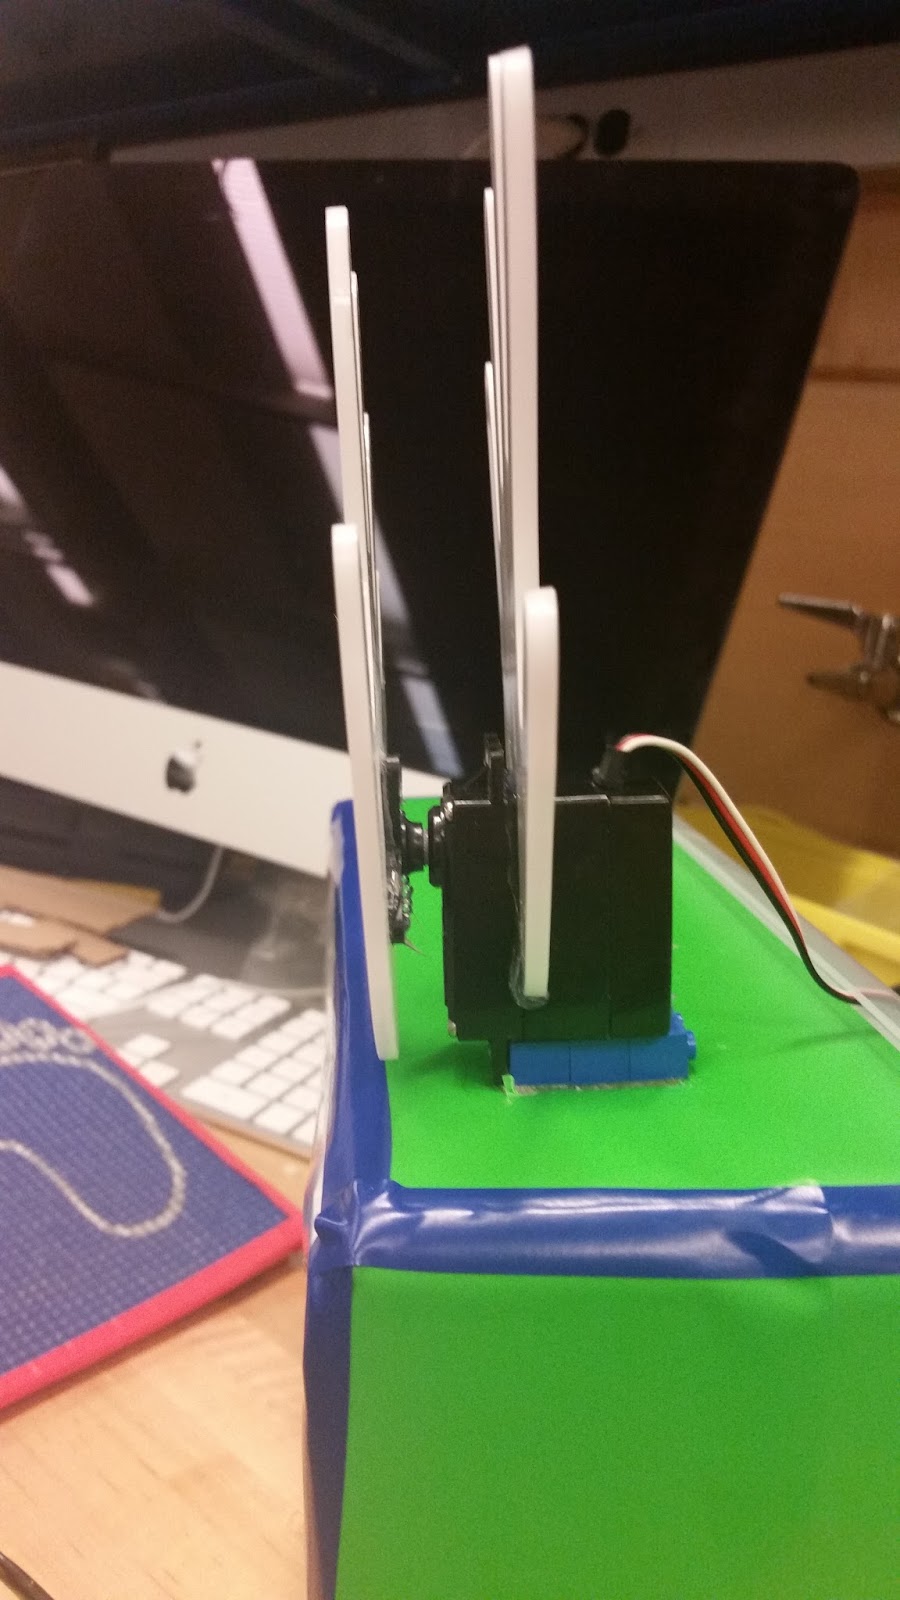
Next we had to laser cut hands to replace our cardboard prototypes. We were able to automatically trace a hand outline we found online in Corel and print that. Our biggest problem was how to attach the hands to the Servo. After deconstructing the Servo and exploring different avenues such as piano wire and pegs and slots, we decided it would be easiest to hot glue the front hand and cut a slot out of the back hand that would allow it to slide onto the Servo. Hot gluing the front hand worked perfectly fine. We used a file to rough up the contact area between the hand and the Servo so that the glue would work better. It's very secure, and since there won't be any force pulling on the hand, it shouldn't come off the Servo. We did run into a bit of trouble with the back hand. We wanted to make the slot a tight fit so that it wouldn't wiggle or fall off the Servo. Therefore, we made the width of the slot slightly smaller than the width of the Servo and planned to file it if necessary. This plan worked out fine at first, but eventually it turned out that the fit was too tight, and the hand snapped in half. We had to print a new hand, this time making the slot a loose fit and hot gluing it onto the Servo.
The only problem we couldn't solve this week was the music maker. It turns out that we somehow permanently altered the shield after connecting the Servo to it, and it wouldn't work anymore. Unfortunately, we decided to remove the music component from our project.
The last step was setting everything up and making it look pretty. We wrapped our box in green vinyl to conceal the circuit inside. We lined the edges of the vinyl with blue tape to keep them from peeling. We drilled two holes in the side of the box so that we could put the on/off switch on the outside of the box. After looping the cords through the holes, we zip-tied them together tight on the inside of the box so that the switch wouldn't move. We then covered the holes with vinyl on both sides in order to reduce the chances of water getting inside the box. Lastly, we had to attach the Servo to the box. We hot glued a lego to the bottom of it in order to give it a flat surface, and then we glued it to the box. Since it was glued to the vinyl instead of thee actual box, the movement of the hands caused it to wiggle. We had to cut the vinyl around the Servo, scrape off the vinyl and glue, and then glue the Servo back onto the actual box. Now it barely wiggles at all.
Here's our final, perfectly working code! It's been a long time coming. Below the code are some some close-up pictures of various components, and finally, a video of our working final product!